![]()
![]()
![]()
![]()
![]()
![]()
![]()
![]()
![]()
![]()
![]()
Rules > Complete Guide
Introduction
 In
the far future there will be a war in this region of the galaxy. Two Super
Powers have declared war to each other. The United Federation of Planets
has mined the entrance of the so called Bajoran Wormhole, the doorway
to the other side of the galaxy, the domain of the Dominion. Dominion
troops on this side of the wormhole have formed an alliance with the Cardassian
Union, an once mighty state, which seeks to regain its power. The Federation
on the other hand is supported by the Klingon and Romulan empire which
both have learned that the Dominion will not stop after conquering the
UFP.
In
the far future there will be a war in this region of the galaxy. Two Super
Powers have declared war to each other. The United Federation of Planets
has mined the entrance of the so called Bajoran Wormhole, the doorway
to the other side of the galaxy, the domain of the Dominion. Dominion
troops on this side of the wormhole have formed an alliance with the Cardassian
Union, an once mighty state, which seeks to regain its power. The Federation
on the other hand is supported by the Klingon and Romulan empire which
both have learned that the Dominion will not stop after conquering the
UFP.
Prepare for Battle
At the moment "TrekWar - The Battle Card Game" (BCG) is a two-player only game. Each player will command a set of 30 cards. These so called Decks play differently.
 -
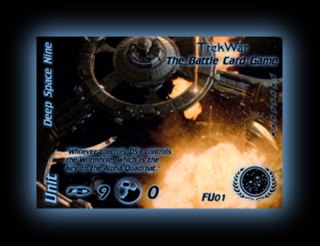
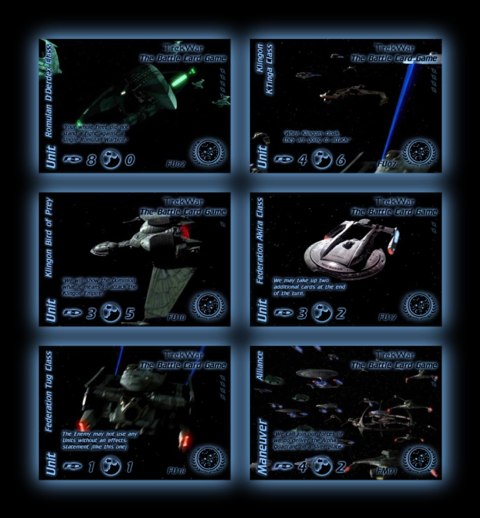
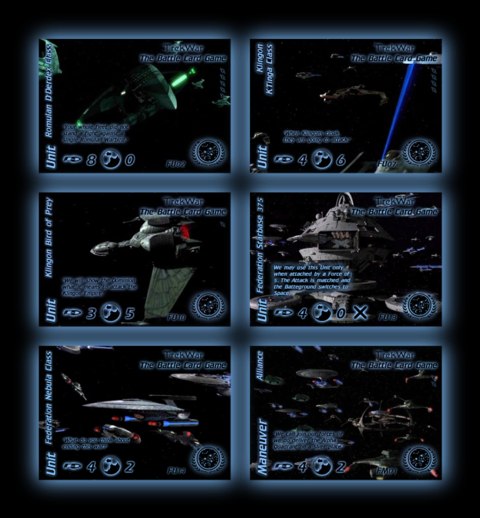
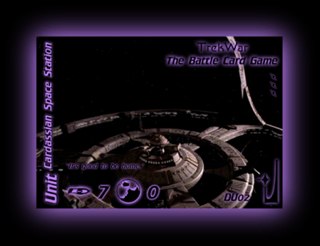
Federation (blue): The Federation has mighty allies and controls the Space
Station called "Deep Space Nine", which is the strongest Unit
in the Game.
-
Federation (blue): The Federation has mighty allies and controls the Space
Station called "Deep Space Nine", which is the strongest Unit
in the Game.
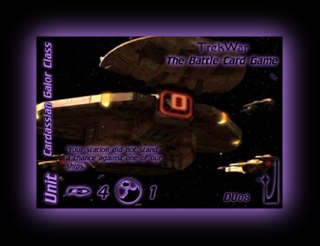
![]() -
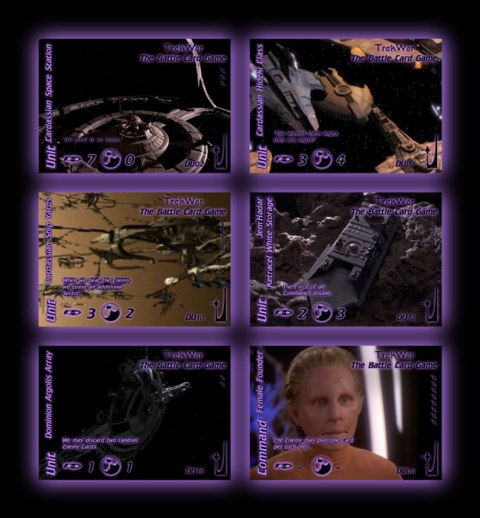
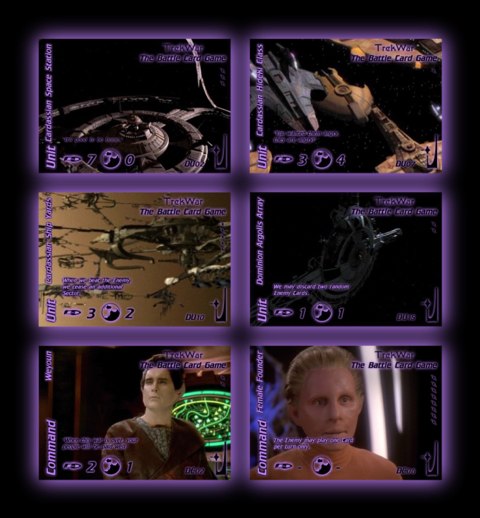
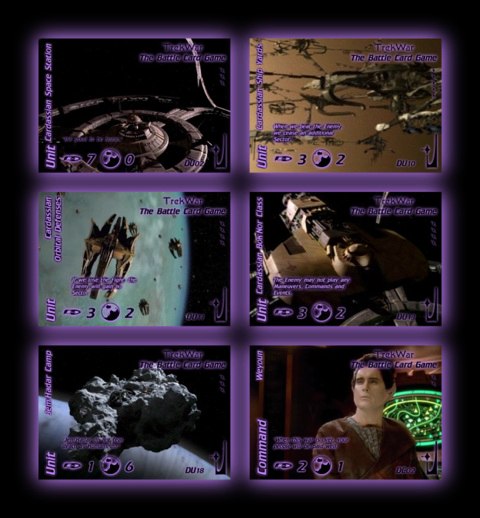
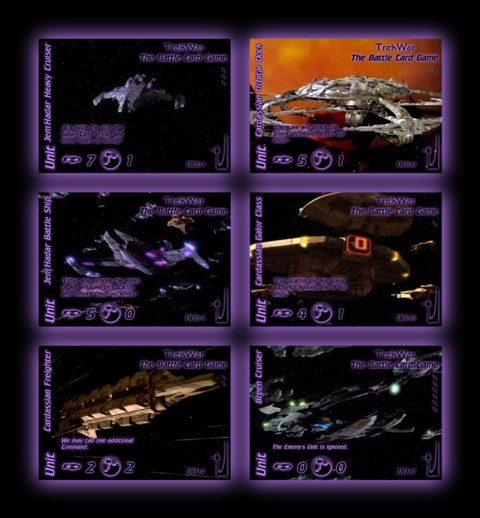
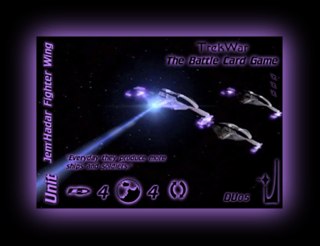
Dominion (violett): The Dominion has the ability to quickly create reinforcements.
Moreover, Dominion technology is more advanced than the Federation's.
-
Dominion (violett): The Dominion has the ability to quickly create reinforcements.
Moreover, Dominion technology is more advanced than the Federation's.
Download the card sheets and print them on thick paper (at least 150g/m²). With a cutting knife and a metal ruler you can easily clip the single cards.
Moreover you will need to download, print and cut out the board with the two fleet indicators. Either you know your printer well enough to print on both sides, or you have to glue the backs of two different coloured hexagons.
Getting Ready
- Each Player has to shuffle his/her Deck. Build a card pile (face down) for each side.
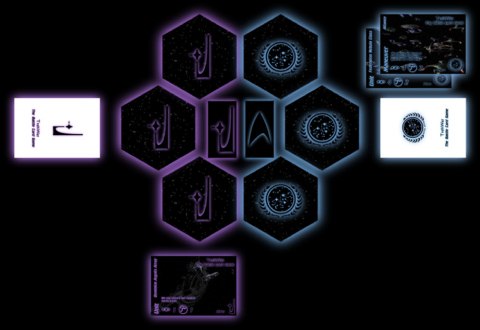
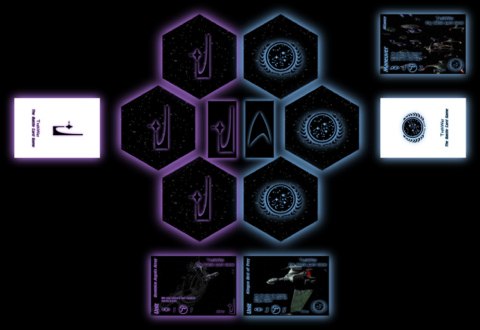
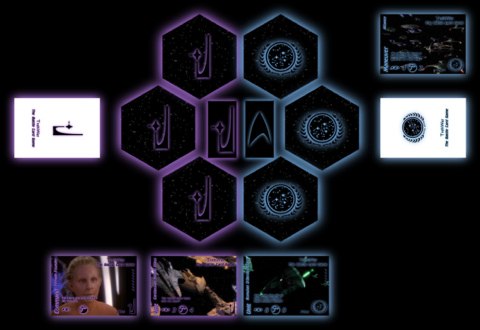
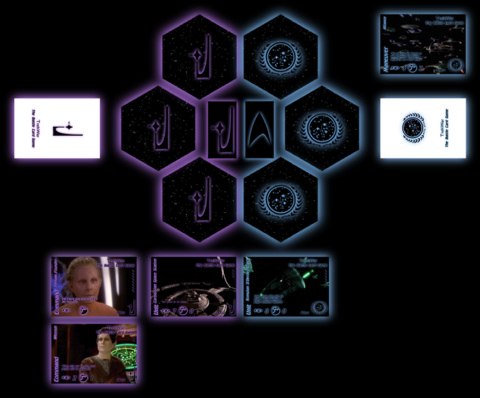
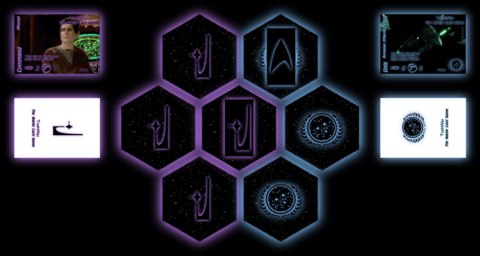
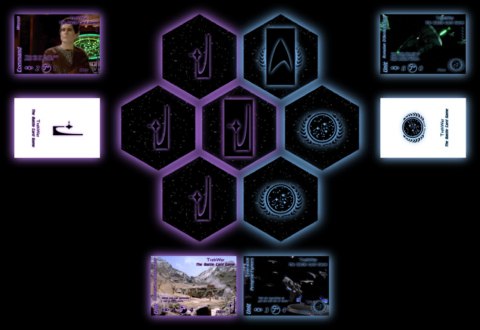
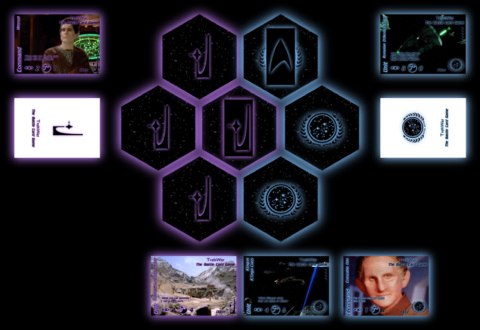
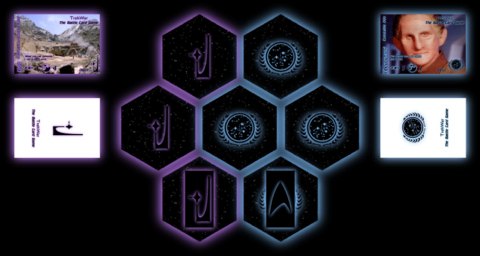
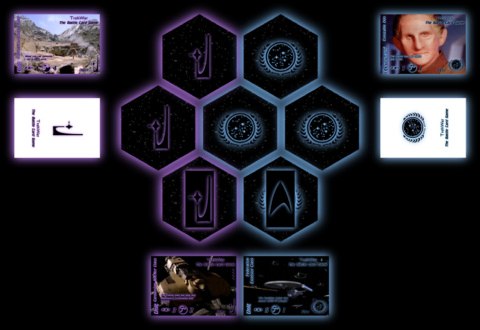
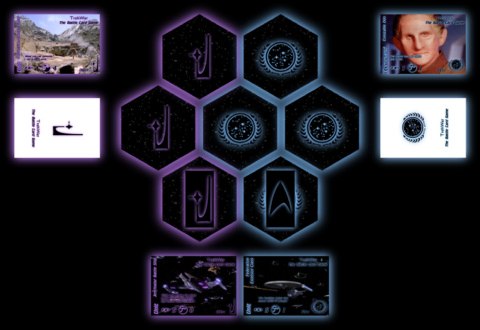
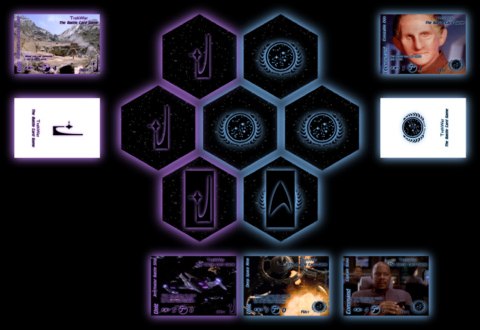
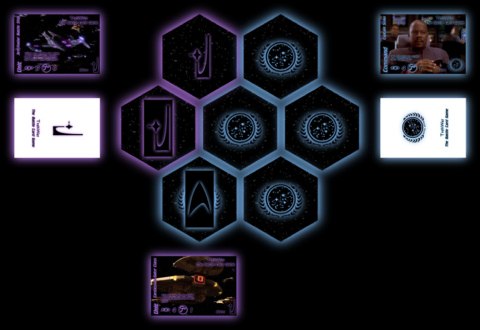
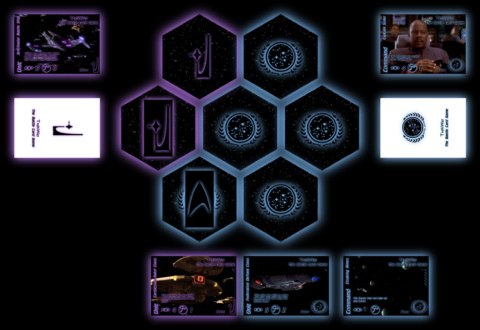
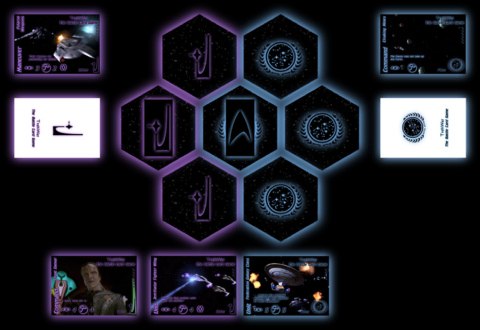
Arrange the playing materials like this:
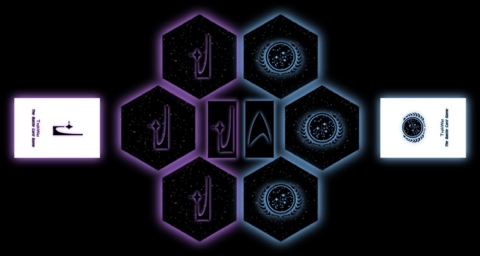
- place six hexagons (Sectors) in a circle, three in the colour of the Federation and three in the colour of the Dominion player.
- the central Sector is the first battleground. Its colour will be decided after the first skirmish. Therefore place the two indicators (Fleets) there.
- each player puts his Deck pile in front of her/his Sectors.
The Goal of The Game
The players are to take control of all Sectors. This they accomplish by fighting for each territory with their forces represented by their Decks.
The Structure of the Battle
The game is divided into single Fights. In order to seize a Sector from the other Player, one has to win a Fight for that territory. The first Fight is for the central Sector. After that, the Player who has lost the last Fight decides for what Sectors he wants to fight next. Therefore he places his Fleet in the Sector from which he wants to attack (there must be a neighbouring enemy Sector). Then he picks a neighbouring enemy Sector he wants to seize. There the other Player places her/his Fleet.
Example:
 -
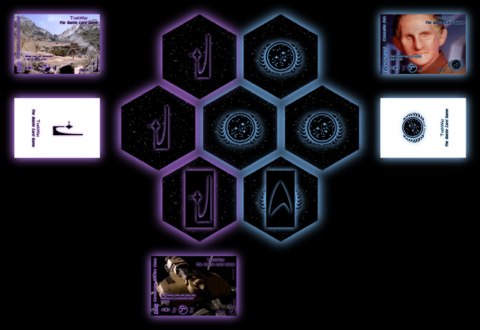
In the opening Fight the Federation player has won the central Sector.
-
In the opening Fight the Federation player has won the central Sector.
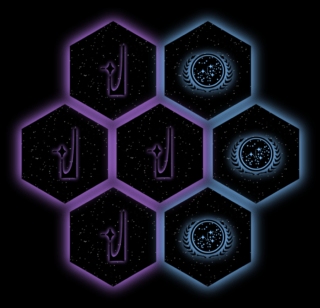
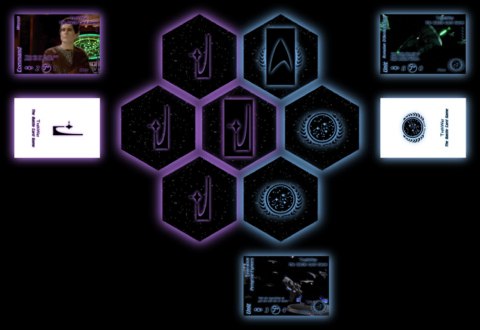
- Now the Dominion player may choose where to continue the Battle.
- He decides to attack from his upper left Sector and wants to take the central territory.
- So he places his Fleet in the upper left Sector, and the Federation Fleet is placed in the central Sector.
If the attacking player wins the Fight, then she/he seizes the Sector where the enemy Fleet is located. If the attacking player looses the Fight, then the defending Player seizes the Sector from which the enemy Fleet attacked.
Example:
- Situation like in the last Example
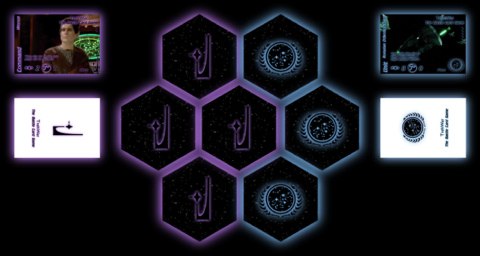
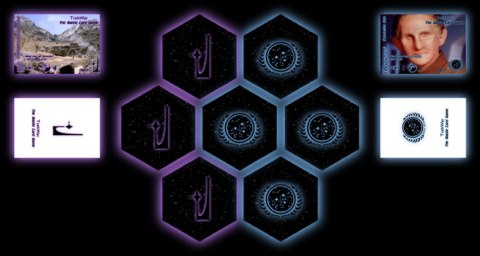
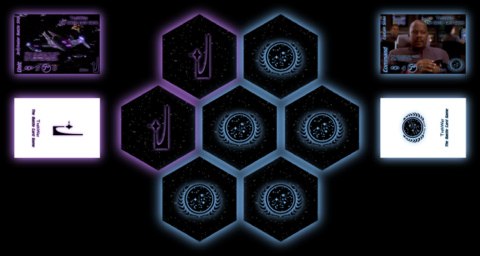
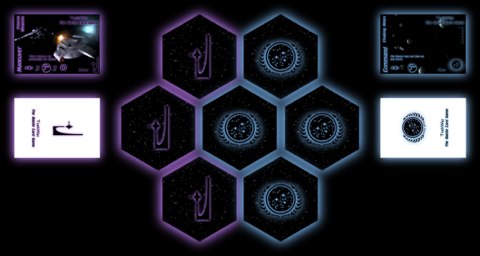
- If the Dominion player wins, the board changes this way:
because the Dominion player defeated the Federation Fleet in the central Sector.
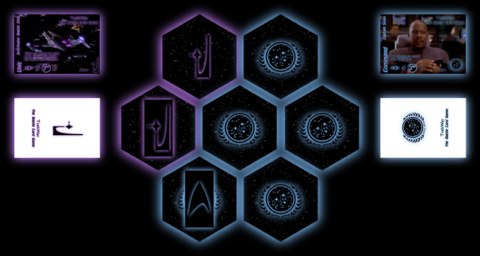
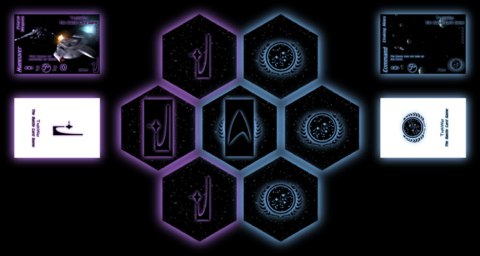
- If the Federation player wins, the board changes to:

because the Federation defended all Dominion forces coming from the upper left Sector.
The game ends when:
- One player occupies all Sectors. Then she/he has won the Battle.
- A Battle ends with one player who has depleated her/his Deck pile. Then the Player who controls more Sectors than the other wins the Battle.
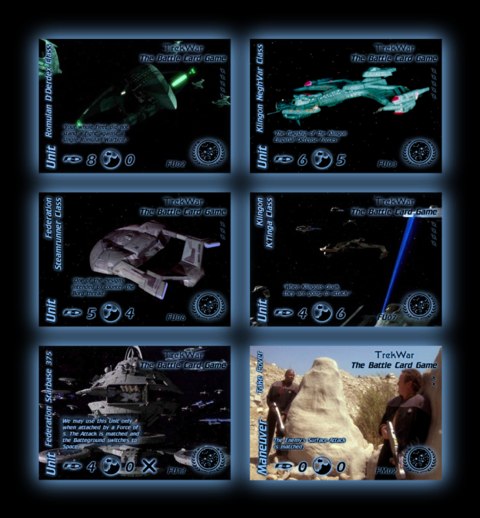
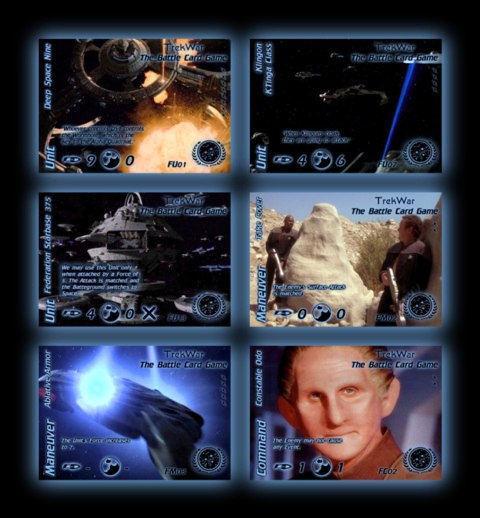
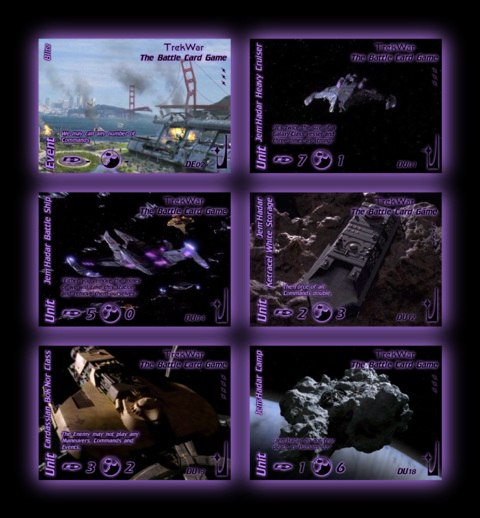
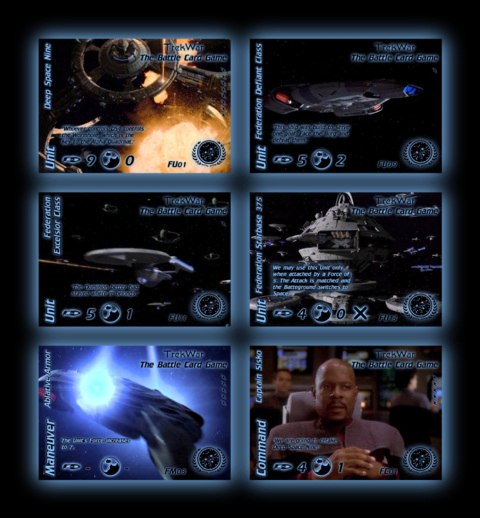
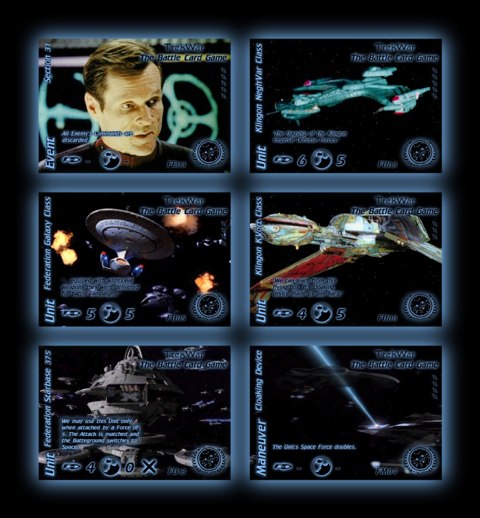
About the Cards:
There are four different types of Cards. Most of them share common features. So there is not much to learn before starting to play.
 -
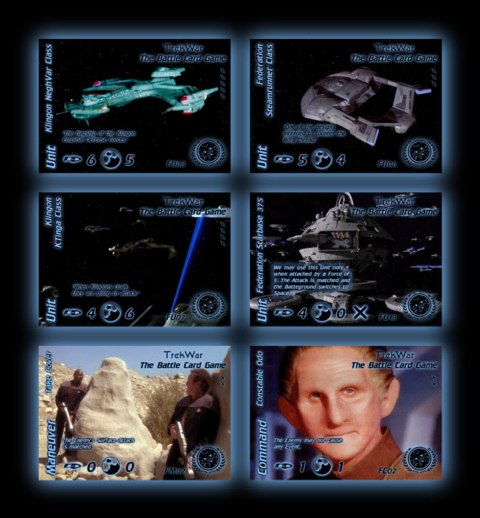
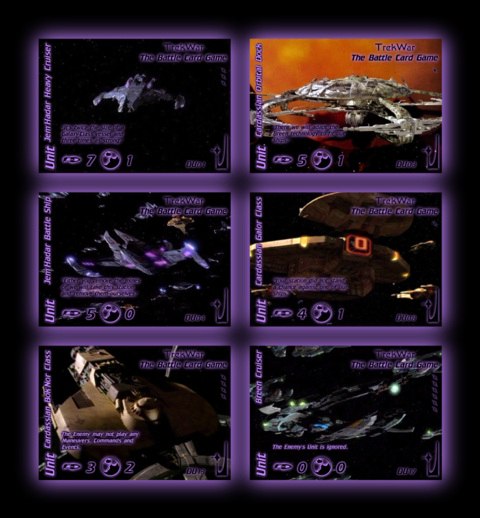
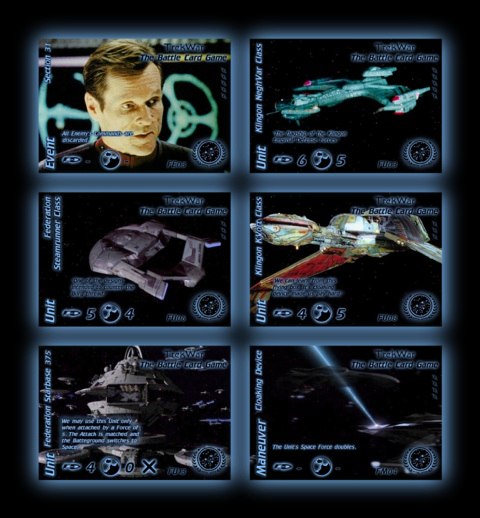
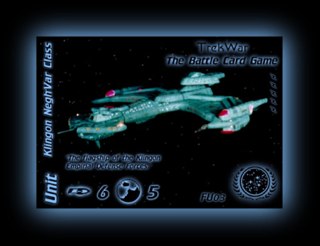
Units: These are the most common Cards in the game. They represent the
ships, troops and installations of the two Fleets. One Unit must be played
each Turn.
-
Units: These are the most common Cards in the game. They represent the
ships, troops and installations of the two Fleets. One Unit must be played
each Turn.
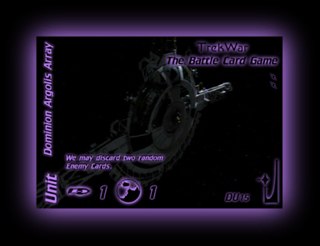
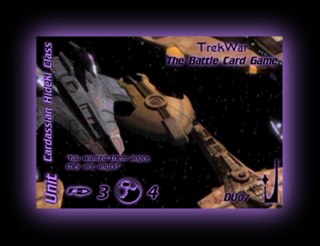
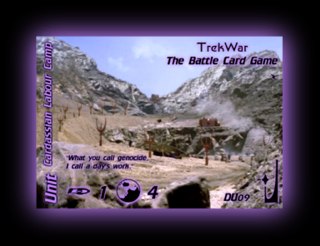
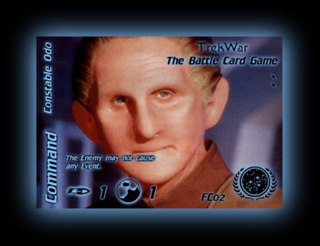
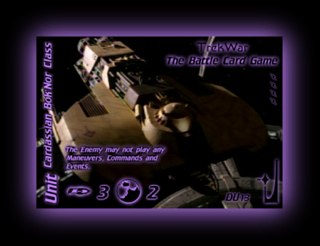
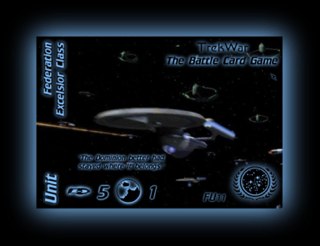
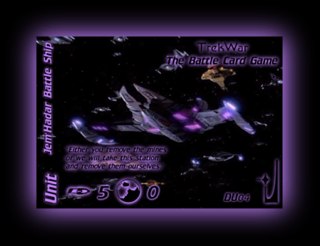
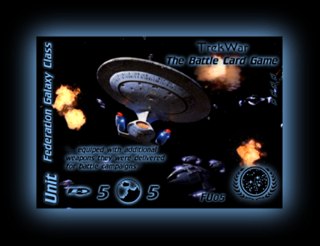
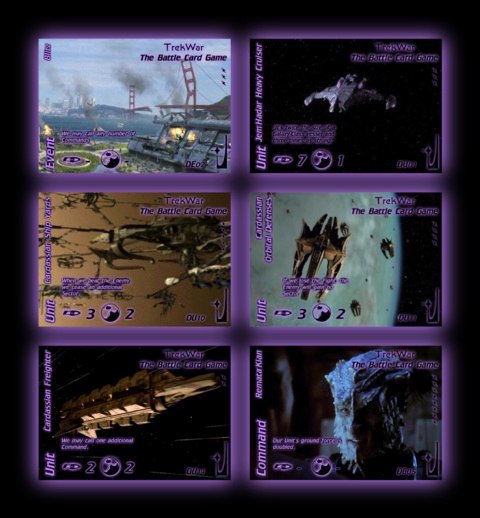
![]() One can identify a Unit by the title "Unit".
One can identify a Unit by the title "Unit".
![]() The Name of the Unit identifies it. This sounds trivial, but the exact
name of a Unit will become important in later editions and additions of
and to the BCG.
The Name of the Unit identifies it. This sounds trivial, but the exact
name of a Unit will become important in later editions and additions of
and to the BCG.
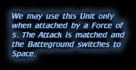
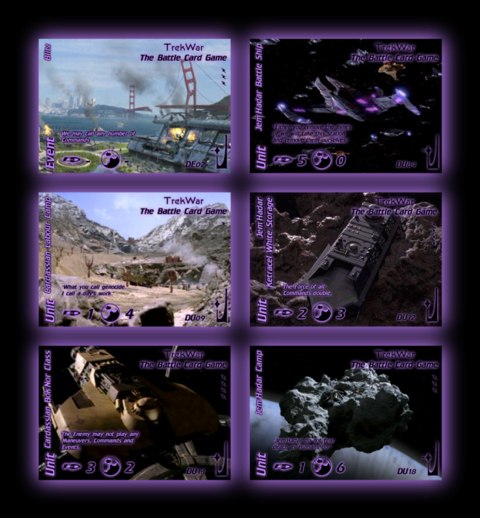
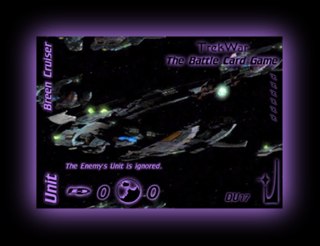
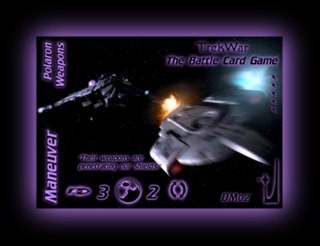
![]() A short text next to the Cards name can be a very important thing to pay
attention to. If the Text is black againt a lit background (like in the
picture above) it is just a quote or description. These black texts can
be ignored, their only purpose is to add depth to the atmosphere of the
Game.
A short text next to the Cards name can be a very important thing to pay
attention to. If the Text is black againt a lit background (like in the
picture above) it is just a quote or description. These black texts can
be ignored, their only purpose is to add depth to the atmosphere of the
Game.
 Bright texts against a darker background (Special Effects) are a totaly
different thing. The text usually affects the rules of the game. It either
allowes special actions which are not granted by these rules or it disposes
some regulations which usually apply. Special Effects have a higher priority
than the text of these Rules your reading at the moment.
Bright texts against a darker background (Special Effects) are a totaly
different thing. The text usually affects the rules of the game. It either
allowes special actions which are not granted by these rules or it disposes
some regulations which usually apply. Special Effects have a higher priority
than the text of these Rules your reading at the moment.
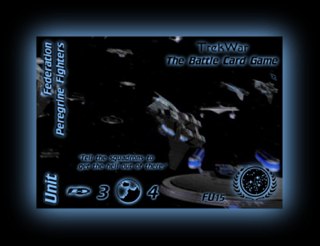
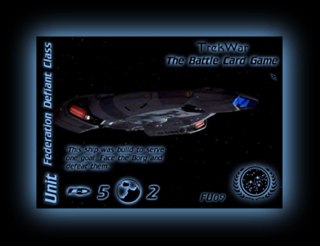
![]() At the bottom of each Card you will find two symbols with two digits.
The starship and the left number represent the Units Force in Space, the
planet and right number represent the Units Force on a planets Surface.
At the bottom of each Card you will find two symbols with two digits.
The starship and the left number represent the Units Force in Space, the
planet and right number represent the Units Force on a planets Surface.
 The cryptic string is a short identifier for each Card. This way you can
refer to a specific Card with just four digits.
The cryptic string is a short identifier for each Card. This way you can
refer to a specific Card with just four digits.
The Fleet emblem is for quick reference only (especially for players who are colour blind).
![]() There are also
a number of bolts on most Cards. These can be ignored at the moment. In
later additions of the game these will make Deck building possible.
There are also
a number of bolts on most Cards. These can be ignored at the moment. In
later additions of the game these will make Deck building possible.
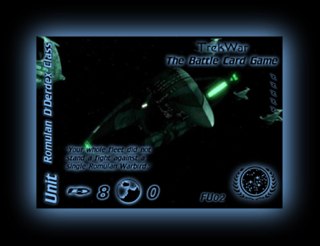
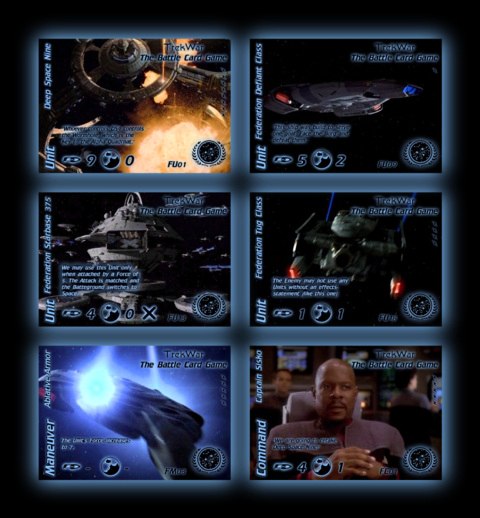
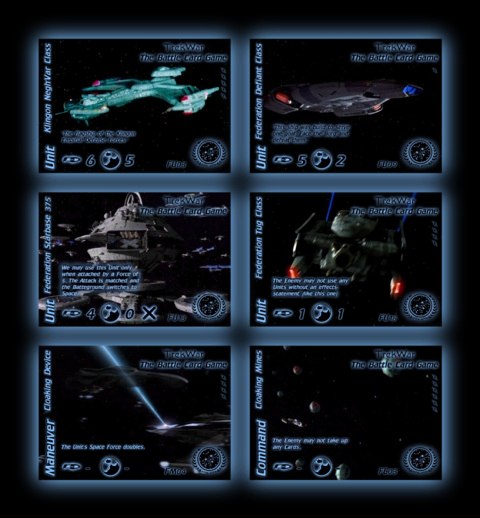
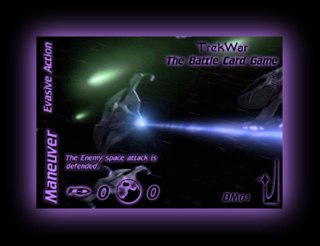 -
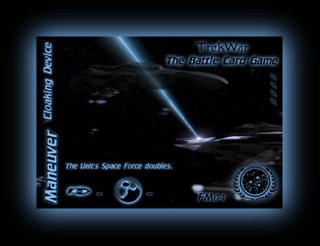
Maneuvers: These Cards represent the special moves a Unit can perform.
They are always played in addition to a Unit and boost its Forces and/or
add Special Effects. A Maneuver causes a tactical advantage that lasts
just one turn.
-
Maneuvers: These Cards represent the special moves a Unit can perform.
They are always played in addition to a Unit and boost its Forces and/or
add Special Effects. A Maneuver causes a tactical advantage that lasts
just one turn.
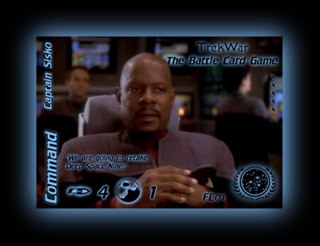
- Commands: These Cards represent the strategic aspects of Battle, e.g. leadership or technological advantages. Like Maneuvers, Commands can add Force and Special Effects to Units. But in difference Commands have long lasting effects for a whole Fight.
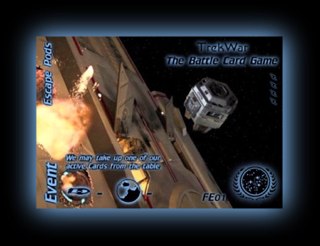 -
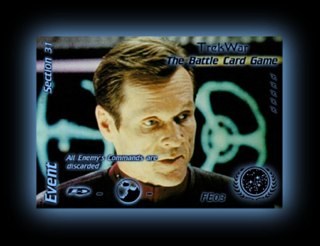
Events: These Cards represent the strategic moves that are typically for
the Player's race. Events cause global changes in the Game, which do not
only affect the fighting Units.
-
Events: These Cards represent the strategic moves that are typically for
the Player's race. Events cause global changes in the Game, which do not
only affect the fighting Units.
Like Maneuvers, Events grant certain tactical advantages for just one turn but cause no direct boost of a Unit's abilities. An Event's Special Effect more likely gives a player more options to make her/his next turn, than supporting a Unit's fighting capabilities.
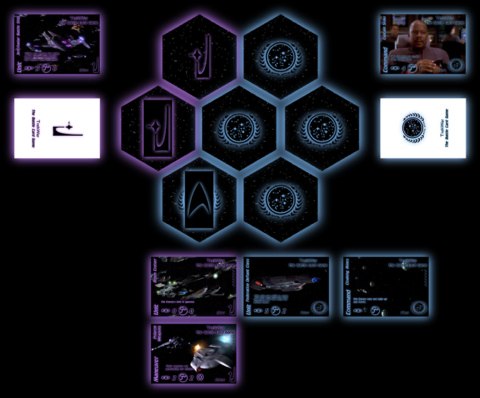
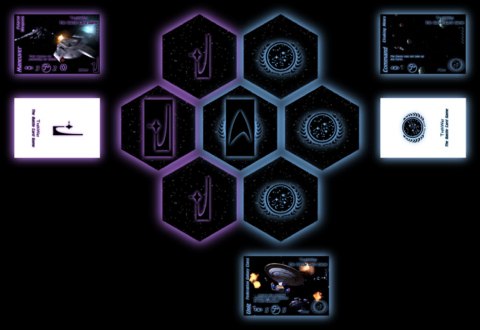
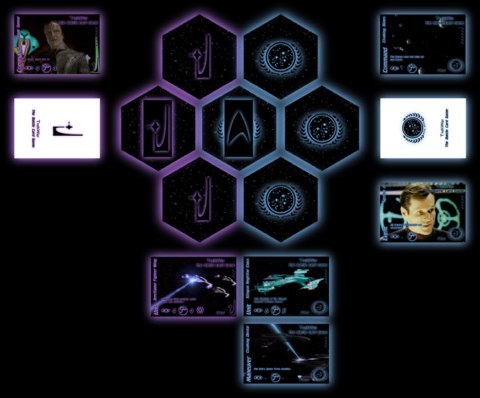
About the Table:
The Board is just one part of the complete set up of all playing materials (Table). The Cards are also arranged in a special way. This layout makes sure that all important information is clearly visible to both players. A complete Table in Game should look like this:
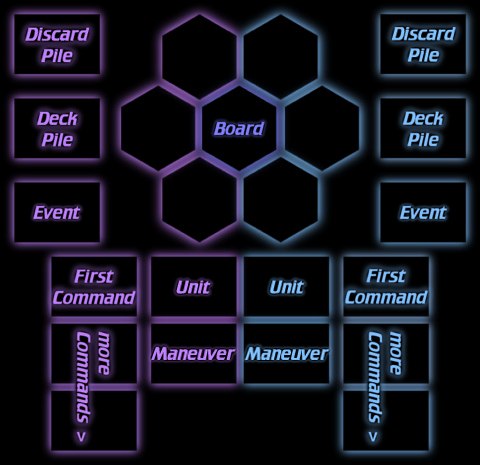
All Player's Cards in the bottom half (Units, Maneuvers, Commands) are refered to as Combating Forces.
Just Cards laying on top and facing up are considered active. The Discard Pile is an exception: No discarded Card can be an active Card.
Note: The Discard Pile is the place, where Cards are placed which usually can not be played again in the Game. Please differentiate between "dropping" and "discarding" a Card. If a Card is discarded, it means that the Card must be placed on top of the Discard Pile. Cards which are dropped usually are dealt with imediately (e.g. shuffled into the Deck Pile) and remain in the Game.
Fighting for a Sector:
When a fight for a Sector begins, both Players take up Cards from their Deck Pile until they have six Cards on their hand (Hand).
After that, each Player may decide to drop up to three Cards from her/his Hand in order to take up the same number of new Cards from his/her Deck Pile. The dropped Cards are shuffled with the rest of the Deck Pile.
Note: Rarely a Player might have more than six Cards on her/his Hand. In that case she/he may not take up any additional Card. She/He may not exchange more than three Cards with the Deck Pile.
Now the attacking player opens the Fight by playing one Card "Unit" and calling the Battleground (Space or Surface). Usually the Battleground will not change for the rest of the Fight. After that she/he may take up Cards from her/his Deck Pile as long as she/he has less than six Card on her/his Hand.
Note: In the first Fight there is no attacking Player. It is suggestet, that the older player opens the Fight. In a series of games the Player who won the last game opens the first Fight of the new Battle.
A Unit is placed face up next to the Board on the Players side of the table.
Example:
- The game has begun, and the table looks like this:
- Now both players get their first Hand. First they take up six Cards from their Deck Piles, then they decide, which Cards they want to drop in order to get other Cards from their Deck Piles.
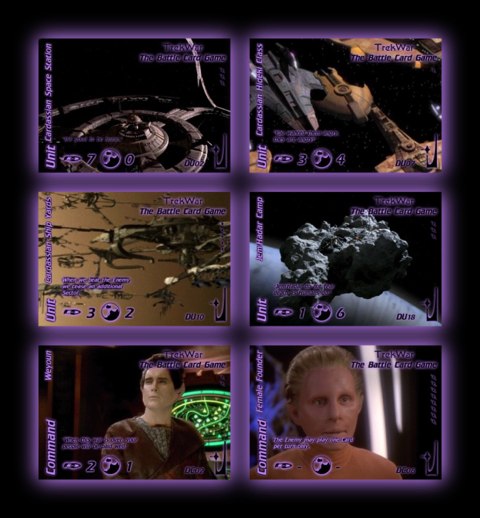
The first six Cards on the Dominion Hand:
As the Dominion Player is the older one, he may call the first Battleground. The player decides to make use of the nice Space Force of the "Cardassian Space Station". Therefore he needs a strong Hand which can support a Space Fight. In this context he decides to drop "Jem'Hadar Ketracel White Storage" which is less powerfull in a Space fight. He takes up "Weyoun" which happens to be a Card that helps a Space Fight. Now his Hand looks like this:
The Federation Player takes up the following Cards:
She does not know at which Battleground the Dominion will attack. So she decides to drop "Federation Akira Class" and "Federation Tug Class" which are not so essential to her tactic. She hopes for stronger Units and gets "Federation Starbase 375" and "Federation Nebula Class" from her Card pile:
- Both players add the dropped Cards to their Decks and shuffle them.
- Now the Dominion Player playes his first Unit.
He has four options: "Cardassian Space Station", "Cardassian Hideki Class", "Cardassian Ship Yards" and "Dominion Argolis Array". He decides to play "Dominion Argolis Array", because the Card is quite difficult to play in the middle of a fight. On the other Hand, the Special Effects text on the Card allowes him to weaken the other Player's Hand:
He names "Space" as Battleground. The Federation player shuffles her Cards and the Dominion player randomly takes "Federation Nebula Class" and "Alliance", which he discards onto the Federation Discard Pile next to the Federation Deck Pile:
Note: In this picture both Cards on the Discard Pile are visible. This is for demonstration purposes only. In the real game just the top Card of the discard pile shall be visible.
- The attacking Player takes up Cards from his Deck pile until he has six Cards on his Hand.
Because the Dominion player only holds five Cards on his Hand, he takes up one Card from his Deck pile. It is "Jem'Hadar Camp".
Note: The Federation Player is not the attacking player, so she has to begin her Turn with just four Card to defend the attack.
This is where the defending player begins the first Turn of the Fight.
A Turn consists of different phases (Stages) which are to be played in the following order. If a player uses actions allowed only in a certain Stage, she/he may not longer perform actions from previous Stages in that Turn.
1. Initial Stage: Some Special Effects and Symbols refer to this Stage. Other than that the Player turns her/his last Maneuvers and Events upside down (in order to indicate that they are no longer active).
2. Event Stage: At the beginning of her/his turn a Player may call an Event by playing an Event Card next to his Deck Pile.
3. Surrender Stage: Sooner or later a player will be forced to surrender, because she/he can or want not longer continue the Fight (that means he/she can or wants not meet the requirements to play the Deployment Stage). If a Player chooses to surrender the Sector, he terminates and looses the Fight.
4. Deployment Stage: A player must either perform actions from this Stage or surrender. The player must not perform the Deployment Stage, if she/he can not meet all requirements.
Allowed actions (see "About The Cards" and "About The Table"for details):
- Playing one Unit ON TOP of the last one (replacing it)
- Playing one Maneuver (ON TOP of the last Maneuver) or Command (NEXT to the last Command)
Requirements:
- Playing one Unit
- at the end of the Turn the Player's active Combating Forces (Unit, Maneuver, Commands) must match the Enemy's Attack.
To "match" the Enemy Attack means, that the Player's active Combating Forces must represent at least the same Force than the other Player's active Combating Force in the current Battleground (Space or Surface).
5. Last Stage: Some Special Effects refer to the Last Stage. The Player must name the total of his active Combating Force in the current Battleground and the name of the Battleground (e.g. "10 Space" or "7 Surface"). After that she/he may take up Cards from the Deck Pile as long as she/he has less than six Cards on her/his Hand.
Now the other Player may begin her/his Turn and perform actions from the Stages. This has to be repeated until one of the two Players surrenders.
Example:
- Situation like at the End of the last Example:
The Dominion Player has attacked with a Force of "1 Space".
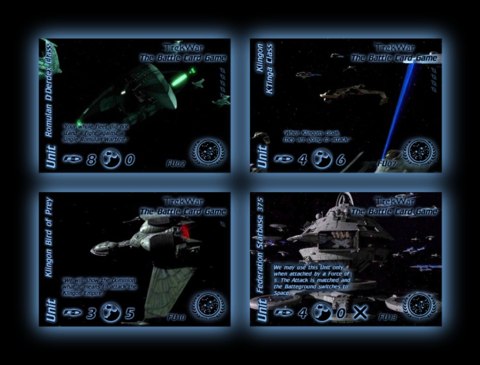
Now it's the Federation Player's Turn. Her Hand is (remember: She lost two Cards to "Dominion Argolis Array" in the Dominion opening):
- Initial Stage: She does nothing.
There are no Special Effects on the Table which relate to the Initial Stage. There are no Maneuvers or Events from her last turn, either.
- Event Stage: She does nothing.
She has not any Event to play on her Hand, so in this Stage she can not perform an action.
- Surrender Stage: She does not surrender.
She can easily match the "1 Space" attack.
- Deployment Stage: She playes "Klingon Bird of Prey".
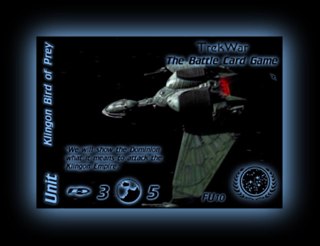
This is a safety-move. As she has had to discard her only Maneuver she decides to wait playing the "Romulan D'Deridex Class" until she can support the ship. The Bird-of-Prey is a fair Unit, but she has no Maneuver or Command to support it.
She matches the Dominion Attack, because the Dominion active Combating Force only represents a Force of "1 Space". Now her Combating Force represents an Attack of "3 Space".
- Last Stage: She calls her Force ("3 Space") and takes up three Cards from her Deck Pile. By this she finishes her Turn.
As her Combating Force is just the Bird-of-Prey, it is easy to count her Force. She only has three Cards left on her Hand. Therefore she may take up three Cards in order to get six Cards again. She takes up "Klingon Negh'Var Class", "Federation Steamrunner Class" and "Take Cover".
The Table looks like this:
It's the Dominion Player's Turn. His Hand:
- Initial Stage: He does nothing.
- Event Stage: He does nothing.
- Surrender Stage: He does nothing.
- Deployment Stage: He plays "Cardassian Hideki Class" and "Female Founder":
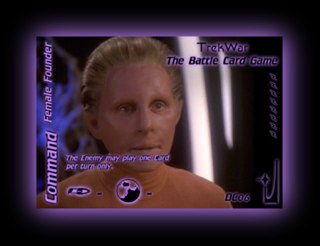
He holds an almost optimal Hand to dictate the Fight: This turn he matches her "3 Space" with the Hideki. By playing the Founder, which allowes her to play one Card per Turn only, he weakens her for the rest of the Fight.
- Final Stage: He calls his Attack ("3 Space") and takes up two Cards from his Deck Pile.
He gets "Cardassian Orbital Defenses" and "Cardassian Bok'Nor Class".
The Table now looks like this:

It's the Federation Player's Turn. Her Hand is:
- Initial Stage - Surrender Stage: She does nothing.
- Deployment Stage: She plays "Romulan D'Deridex Class":
She may play one Card in her Turn only (because of "Female Founder"). That means she can play an Event and surrender, or she can match the Enemy Attack by just playing a single Unit.
Because the Fight will become more violent as the Forces increase, she no longer has the luxory to wait for better Cards to support her Units. She playes the Warbird, hoping, that it will be strong enough to make the other Player struggle.
- Final stage: She calls her Attack ("8 Space") and takes up one Card.
It's "Constable Odo".
The Table:
It's the Dominion Player's Turn. His Hand:
- Initial Stage - Surrender Stage: He does nothing.
- Deployment Stage: He playes "Cardassian Space Station" and "Weyoun":
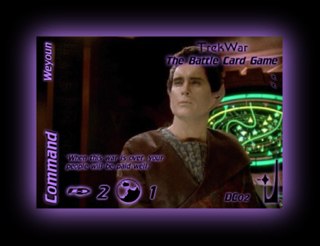
He has no choice but to play exaclty this two Cards or to surrender. This was not exactly how he planned this Fight to continue. Originally he wanted to wait one more Turn before playing his best Unit from the Hand. Now he must hope, that he gets good new Cards from the Deck and that the other Player can not match this Attack.
He matches the Federation Attack because he commands 9 Space on the Table (7 from the Station and 2 from Weyoun).
- Final Stage: He calls his Attack ("9 Space") and takes up two Cards.
"Jem'Hadar Battle Ship" and "Jem'Hadar Camp"
The Table:
Note that a Command is played additional to the last one, therefore the Dominion Player controlls now two Commands in his Combating Force.
It's the Federation Player's Turn. Her Hand:
- Surrender Stage: She surrenders the Sector.
There is just one way she could match the Dominion Attack: The Starbase: Its Special Effects state, that it matches any Attack of a Force of 6 or higher. But she realises, that because of "Female Founder" and "Weyoun" it's going to be much harder to defend the Dominion attacks, not to speak of beating the Dominion Combating Force. Playing the Station would just be a waste. So she chooses a strategic retreat.
- The Dominion Player wins the Fight.
After the Fight, all Cards played as Combating Forces (Units, Maneuvers, Commands) are removed from the Table and discarded. The Player who has won the Battle seizes the Enemy Sector he attacked. After the first Battle the central Sector is put into the Board with the winning side facing up.
Example:
- Situation like at the End of the last Example:
- The Players discard their Units, Maneuvers and Commands.
- The Dominion Player gains the central Sector.
Special Symbols:
There are two special Symbols on some Cards:
![]() "Take
Up": These Cards may be taken up from the Table at the Initial Stage,
if they are not discarded and the Enemy Player has no active Card with
the same symbol.
"Take
Up": These Cards may be taken up from the Table at the Initial Stage,
if they are not discarded and the Enemy Player has no active Card with
the same symbol.
![]() "Limited
Action": These Cards may not be played with any other Card in the
Stage. If a "Limited Action" is performed in a Stage, it is
the only action to be performed then.
"Limited
Action": These Cards may not be played with any other Card in the
Stage. If a "Limited Action" is performed in a Stage, it is
the only action to be performed then.
The End.
Comments, suggestions, questions at: The TrekWar-Staff
For illustration purposes, here another example of a Fight. We suggest that you follow it using the real Board and Cards.
Example:
- Situation like at the End of the last Example:
- The Federation Player chooses to attack the central Territory from the top right Sector:
Her Hand is:
- She droppes two Cards and takes up two new Cards from the Deck Pile.
She tends to launch a Surface Attack because if necessary she can match any Dominion Attack by playing "Take Cover". So she droppes "Klingon Negh'Var Class" and "Federation Steamrunner Class".
She gets "Klingon K'Tinga Class" and "Ablative Armor". Both Cards are ideal to support a Surface Attack.
- The Dominion Player droppes two Cards and takes up two new Cards from his Deck Pile.
He droppes "Cardassian Orbital Defenses" and "Cardassian Ship Yards" because he has to many weak Units with Special Effects on his Hand. He hopes for Cards with more Force. He gets "Blitz" and "Cardassian Labour Camp".
- Both Players shuffle their Cards into their Decks.
- She opens the Fight with "Federation Peregrine Fighters":
She takes it slowly.
- She calls "Surface" as Battleground.
- She takes up one Card fromher Deck Pile.
It's "Deep Space Nine".
The Table:
- It's the Dominion Player's Turn. His Hand:
- He playes "Cardassian Labour Camp":
He is in the defensive. Although "Jem'Hadar Camp" is a quite fair Surface Unit, he can not support it enough to make it a real thread.
- He calls his Attack ("4 Surface") and takes up one Card from his Deck Pile.
He gets "Jem'Hadar Heavy Cruiser".
The Table:
It's the Federation Player's Turn. Her Hand:
- She plays "Klingon K'Tinga Class" and "Constable Odo":
Now she delivers her real Attack. Thanks to Odo the Dominion PLayer may not call any Events. Just in case the Dominion Player could still match this Attack she has every option to respond.
- She calls her Attack ("7 Surface") and takes up two Cards from th Deck Pile.
Remember: Add Unit's, Maneuver's and Command's strength (6 K'Tinga + 1 Odo). She gets "Klingon K'Vort Class" and "Captain Sisko".
The Table:
It's the Dominion Player's Turn:
- He surrenders the sector.
He simply has not the Cards to counter an "7 Surface" Attack. The Event he may not play because of Odo (besides he has no Commands to play), the Cruiser and the Battle Ship are strong in Space only, the Ketracel Storage and the Freighter are to weak and even the Camp can not halp him without a Maneuver or Command.
The Table:
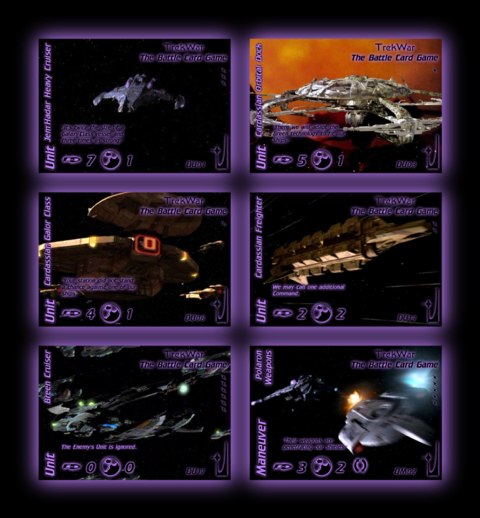
- The Dominion Player attacks the lower right Sector from the lower left:
- He drops three Cards and takes three new ones from the Deck.
Hoping for some Maneuvers and Commands he let's go of "Blitz", "Jem'Hadar Ketracel White Storage" and "Jem'Hadar Camp". He has no luck and gets "Cardassian Orbital Dock", "Crdassian Galor Class" and "Breen Cruiser".
- The Federation Player droppes two Cards and takes up two new ones.
She suspects an Space Attack as the Dominion Player could not match her last Surface assault. So she gets rid of "Klingon K'Vort Class" and "Take Cover". She gets "Federation Defiant Class" and "Federation Excelsior Class".
- Both players shuffle the dropped Cards into their Decks.
The Dominion Hand:
- He opens the Fight with "Cardassian Bok'Nor Class" and calls for "Space" as Battleground:
As he has no unbeatable Units on his Hand, he decides to force the Federation Player a fair Unit first. Because of the Bok'Nor she may not play any Event, Maneuver or Command.
- He takes up one Card.
It is "Cardassian Freighter".
The Table:
- It's the Federation's Turn. The Player's Hand:
- She playes "Federation Excelsior Class":
When the time comes, she will play DS9 with Captain Sisko. But because of the Bok'Nor this will has to wait.
- She calls her Attack ("5 Space") and takes a Card from the Pile.
It's "Federation Tug Class".
The Table:
- It's the Dominion Player's Turn:
- He plays "Jem'Hadar Battle Ship":
He has almost no alternative. This way he can keep the Heavy Cruiser and the Breen Cruiser to defend the next Attack.
- He calls his Attack ("5 Space") and takes up a Card.
It's "Polaron Weapons".
The Table:
- It's the Federation Player's Turn:
- She plays "Deep Space Nine" and "Captain Sisko":
Now it's time for her to strike.
- She calls her Attack ("13 Space") and takes up two Cards.
Namely "Cloaking Device" and "Cloaking Mines".
The Table:
- It's the Dominion Player's Turn:
- He surenders.
Two words: No way! Even with the Breen Cruiser which can ignore DS9, there are still 4 Space to match left. The Maneuver can only match 3 Space, so this is a real no win situation.
- The Players discard their Combating Forces and the Federation seizes another Sector:
- The Dominion Player decides to attack the lower left from the central left Sector:
- He does not drop any Card.
- She drops one Card and takes up a new one.
She exchanges "Ablative Armor" against "Klingon Negh'Var Class".
- She shuffles the dropped Card into her Deck Pile.
The Dominion Hand:
- He opens the Fight with "Cardassian Galor Class" in "Space":
With the Breen Cruiser and the Maneuver he is going to play a nasty duo in the next Turn.
- He takes up one Card from the Deck Pile.
It's "Remata'Klan".
The Table:
- It's the Federation Player's Turn:
- She plays "Federation Defiant Class" and "Cloaking Mines":
At the moment she feels pretty confident, that the Negh'Var with the Cloaking Device is going to grant her a quick victory. But before that she wants to weaken the Dominion Player. The Minefield prevents him from taking up any Card in this Fight.
- She calls her Attack ("5 Space") and taes up two Cards from her Deck Pile.
It's "Federation Galaxy Class" and "Take Cover".
The Table:
- It's the Dominion Player's Turn:
- He plays "Breen Cruiser" and "Polaron Weapons":
By this, the Defiant is neutralized (the Attack "decays" to "0 Space" so to say) as well is the next Federation Unit, but the Federation Player still has a Attack of "3 Space" to defend.
- The Dominion Player calls his Attack ("3 Space").
Because of the Minefield he may take up no Card from his Deck Pile.
The Table:
Note how the Maneuver is place directly next to the Unit in order to indicate, that it supports the Breen Ship.
- It's the Federation's Turn:

- She surrenders.
There is no way, she can match 2 Space without a Unit. Even the Starbase can't save her, as her Unit (and its Special Effect) is ignored because of "Breen Cruiser".
The Players gather their Combating Forces and discard them:
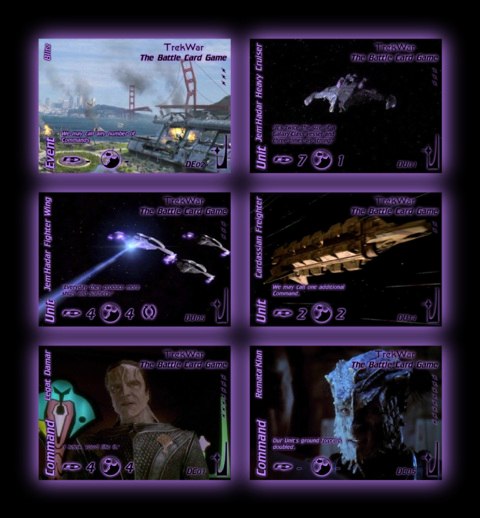
- The Federation Player attacks from the center right in the Heart of
Dominion territory:
- The Dominion Player takes up two Cards from his Deck Pile.
Because he holds less than six Cards at the beginning of a Fight, he may
fill up his Hand. He draws "Jem'Hadar Fighter Wing" and "Legat
Damar".
- The Federation Player droppes two Cards and takes up two Cards from his Deck Pile.
She is well prepared for space combat. The Tug Class and Take Cover yet are not very usefull. "Section 31" and "Klingon K'Vort Class" in return are more handsome.
- The Dominion Player droppes one Card and takes up a new one.
He droppes the Orbital Dock and gets "Blitz".
- It's the Federation's Turn:
- She opens the Fight with "Federation Galaxy Class":
This time she wants to finish him quickly.
- She calls the Battleground ("Space") and takes up a new Card.
It's "Federation Steamrunner Class".
The Table:
- It's the Dominion's Turn:
- He playes "Jem'Hadar Fighter Wing" and "Legat Damar":
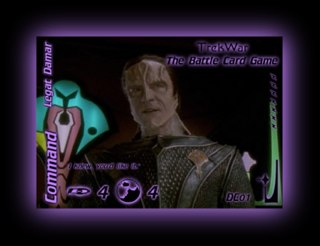
This is a strong move: Damar is going to last for the end of the fight and the Fighters can be taken up at the Initial Stage of each Turn.
- He calls his Attack ("8 Space") and takes up two Cards.
They are "Crdasian Ship Yards" and "Cardassian Orbital Defenses".
The Table:
- It's the Federation's Turn:
- Event Stage: She plays "Section 31" and discards "Damar":
The first Event of the Game. She uses it to assasinate Damar and break the Dominion resistance. By this the Dominion Attack is weakened to "4 Space".
- Deployment Stage: She plays "Klingon Negh'Var Class" and
"Cloaking Device":
This way she plays the most offensive Attack possible.
- She calls her Attack ("12 Space") and takes up three new Cards from her Deck Pile.
Namely "Klingon Vorcha Class", "Federation Miranda Class" and "Federation Akira Class".
The Table:
Note how the Event is placed next to the Card Pile. In this particular case "Legat Damar" was discarded although a Command usually lasts for the whole Fight.
- It's the Dominion's Turn:
- He surrenders.
There are no optiond for him to hold the Sector. Even the Heavy Cruiser can't stop the boosted Klingon flagship without a Maneuver or Command.